Ghostty Terminal Setup on macOS
Ghostty is a fast, native terminal emulator built by Mitchell Hashimoto (of Terraform and Vagrant fame). It's GPU-accelerated, feels incredibly snappy, and comes with sensible defaults - but with the right config, it becomes something special.
Here's my complete setup. Copy these files and you'll have a beautiful, productive terminal in under 5 minutes.
What You'll Get
- Catppuccin theme that auto-switches between light and dark mode with your system
- JetBrains Mono Nerd Font (bundled with Ghostty — no extra install needed)
- Semi-transparent window with background blur (the macOS frosted glass look)
- Quake-style dropdown terminal via "Ctrl+`" — instant terminal from anywhere
- Starship prompt — minimal, fast, and informative
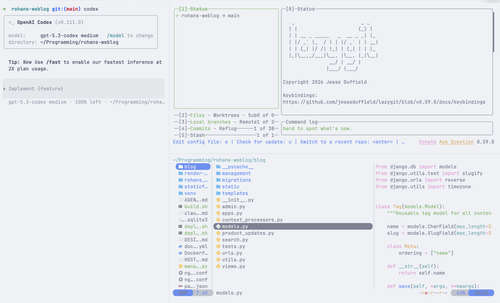
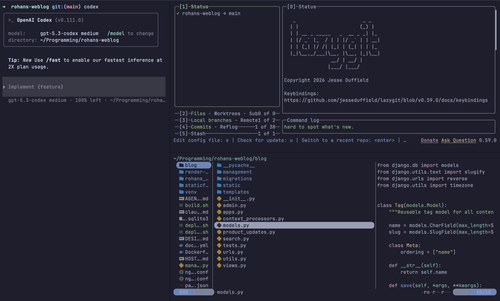
- Lazygit — a full git UI inside your terminal
- Yazi — a blazing fast terminal file manager
- Smart keybindings for tabs, splits, and font sizing
Step 1: Install Ghostty
Download from ghostty.org or build from source.
Ghostty ships with JetBrains Mono with Nerd Font Layer built in, so you don't need to install fonts separately.
Step 2: Ghostty Configuration
Open the Ghostty config with Cmd + , (This opens a plain text file - Ghostty is simple!)
Paste in the following:
# ============================================
# Ghostty Terminal Configuration
# ============================================
# Location: ~/Library/Application Support/com.mitchellh.ghostty/config
# Reload:   Cmd+Shift+,
# Docs:     ghostty +show-config --default --docs

# --- Typography ---
font-family = JetBrains Mono
font-size = 14
font-thicken = true
adjust-cell-height = 2

# --- Theme and Colors ---
# Automatic light/dark switching
theme = light:Atom One Light,dark:Catppuccin Mocha

# --- Window and Appearance ---
background-opacity = 0.9
background-blur-radius = 20
macos-titlebar-style = transparent
window-padding-x = 10
window-padding-y = 8
window-save-state = always
window-theme = auto

# --- Cursor ---
# No cursor-color set: Ghostty uses the theme's foreground color,
# which is dark in light mode and light in dark mode — always visible.
cursor-style = block
cursor-style-blink = false
# Makes the character under the cursor readable in both modes
cursor-text = cell-foreground

# --- Shell Integration ---
# Zsh shell integration overrides cursor-style with a blinking bar unless
# the cursor feature is explicitly disabled here.
shell-integration = zsh
shell-integration-features = no-cursor,sudo,title

# --- Mouse ---
mouse-hide-while-typing = true
copy-on-select = clipboard

# --- Quick Terminal (Quake-style dropdown) ---
quick-terminal-position = top
quick-terminal-screen = mouse
quick-terminal-autohide = true
quick-terminal-animation-duration = 0.15

# --- Security ---
clipboard-paste-protection = true
clipboard-paste-bracketed-safe = true

# --- Performance ---
scrollback-limit = 25000000

# --- Keybindings ---
# Tabs
keybind = cmd+t=new_tab
keybind = cmd+shift+left=previous_tab
keybind = cmd+shift+right=next_tab
keybind = cmd+w=close_surface

# Splits
keybind = cmd+d=new_split:right
keybind = cmd+shift+d=new_split:down
keybind = cmd+alt+left=goto_split:left
keybind = cmd+alt+right=goto_split:right
keybind = cmd+alt+up=goto_split:top
keybind = cmd+alt+down=goto_split:bottom
keybind = cmd+shift+e=equalize_splits
keybind = cmd+shift+f=toggle_split_zoom

# Font size
keybind = cmd+plus=increase_font_size:1
keybind = cmd+minus=decrease_font_size:1
keybind = cmd+zero=reset_font_size

# Config
keybind = cmd+shift+comma=reload_config

# Quick terminal global hotkey (Ctrl+`)
keybind = global:ctrl+grave_accent=toggle_quick_terminal
Why These Settings Matter
| Setting | What It Does |
|---|---|
font-thicken = true |
Makes the font slightly bolder — easier on the eyes on Retina displays |
adjust-cell-height = 2 |
Adds a bit of line spacing so code doesn't feel cramped |
background-opacity = 0.9 |
Slight transparency lets your wallpaper peek through |
background-blur-radius = 20 |
Frosted glass effect behind the transparent window |
macos-titlebar-style = transparent |
Removes the default macOS title bar for a clean, minimal look |
copy-on-select = clipboard |
Select text and it's automatically copied — no Cmd+C needed |
quick-terminal-animation-duration = 0.15 |
Snappy dropdown animation (150ms) |
clipboard-paste-protection = true |
Warns you before pasting potentially dangerous commands |
scrollback-limit = 25000000 |
25MB of scrollback — you'll never lose output |
Step 3: Starship Prompt
Starship is a cross-shell prompt that's fast (written in Rust) and highly customizable.
brew install starship
Create ~/.config/starship.toml:
| Add symbols as per your liking or remove symbols
command_timeout = 1000
right_format = "$aws"
[vagrant]
format = 'via [⍱ $version](bold white) '
[terraform]
format = 'via [$symbol$version $workspace]($style) '
[docker_context]
symbol = " "
format = 'via [$symbol $context](blue bold)'
[git_branch]
symbol = " "
[git_commit]
tag_symbol = ' '
[nodejs]
symbol = " "
This gives you: - Git branch shown with a branch icon - Node.js version when in a JS project - Docker context when active - Terraform workspace when in a TF project - AWS profile on the right side of the prompt
Step 4: Lazygit — A Full Git UI in Your Terminal
Lazygit gives you an interactive git interface without leaving the terminal. Stage files, write commits, manage branches, resolve merge conflicts, cherry-pick, rebase - all with keyboard shortcuts.
brew install lazygit
Run lazygit inside any git repo. You get visual staging, interactive rebase, merge conflict resolution, branch management, and a commit graph — all without memorizing git flags.
| Key | Action |
|---|---|
Space |
Stage/unstage file |
c |
Commit |
p |
Push |
P |
Pull |
b |
Branch menu |
] / [ |
Switch panels |
Enter |
View file diff / expand |
? |
Show all keybindings |
Lazygit works beautifully inside a Ghostty split — press Cmd+D to split right, run lazygit in one pane, and keep your editor in the other.
Step 5: Yazi — A Fast Terminal File Manager
Yazi is a terminal file manager written in Rust. It's async, supports image previews natively in Ghostty, and uses vim-style keybindings. Think of it as a modern replacement for ls and cd — browse directories, preview files, and open them without leaving the terminal.
brew install yazi
Run yazi in any directory to start browsing.
Step 6: Shell Configuration
Add this to your ~/.zshrc:
# Starship prompt
eval "$(starship init zsh)"

# Zsh autosuggestions (fish-like suggestions as you type)
source $HOME/.zsh/zsh-autosuggestions/zsh-autosuggestions.zsh
Install zsh-autosuggestions:
git clone https://github.com/zsh-users/zsh-autosuggestions ~/.zsh/zsh-autosuggestions
Step 7: Keybinding Cheat Sheet
Ghostty
| Shortcut | Action |
|---|---|
Cmd + , |
Open config file |
Cmd + Shift + , |
Reload config |
Ctrl + `` |
Toggle quick terminal (global — works from any app) |
Cmd + T |
New tab |
Cmd + W |
Close tab/split |
Cmd + Shift + Left/Right |
Switch between tabs |
Cmd + D |
Split right |
Cmd + Shift + D |
Split down |
Cmd + Alt + Arrow Keys |
Navigate between splits |
Cmd + Shift + E |
Equalize split sizes |
Cmd + Shift + F |
Zoom/unzoom current split |
Cmd + Plus/Minus |
Increase/decrease font size |
Cmd + 0 |
Reset font size |
Quick Start (TL;DR)
# 1. Install everything
brew install starship lazygit yazi
git clone https://github.com/zsh-users/zsh-autosuggestions ~/.zsh/zsh-autosuggestions

# 2. Download Ghostty from https://ghostty.org

# 3. Open Ghostty, press Cmd+, to open config, paste the config from this post

# 4. Copy the Starship config to ~/.config/starship.toml

# 5. Add the shell config to ~/.zshrc

# 6. Press Cmd+Shift+, to reload — done!
The Workflow
Here's how all of this comes together in practice:
Ctrl + ``— Summon the dropdown terminal from anywhere on your Macyazi— Browse to your project directoryCmd + D— Split the terminal, run your editor on one sidelazygit— Open lazygit in the other split to manage your git workflowCmd + Shift + E— Equalize your splits when they get uneven
Everything runs natively, everything is fast, and everything looks great.
No Electron. No bloat. Just a terminal that gets out of your way.
Cheers
RS